Creating an Ownable Smart Contract in Solidity for Ethereum
When it comes to smart contracts, being able to provide access control is incredibly important. Certain functions, such providing the ability to mint a token, or transfer an asset, need to utilize access control in order to make sure that unauthorized calls to functions cannot be made.
When it comes to smart contracts, being able to provide access control is incredibly important. Certain functions, like providing the ability to mint a token, or transfer an asset need to utilize access control in order to make sure that unauthorized calls to functions cannot be made. A fundamental concept in terms of access control for smart contracts is the concept of contract ownership. A contract owner can be set as the only person who can access those critical functions, providing a way to secure the application. We call this type of contract an "ownable" contract, which provides access control to a single admin user.
In this article we're going to implement a Document Registry, which will take a SHA256 hash value of any document and stores that hash on the blockchain with a unique timestamp. This application pattern is typically used for storing digital signatures which can be used to validate that a document is unique even after it has been transferred to another. The application will allow the contract owner to add a document to the smart contract, and also allows them to verify that the document is unique.

The Vibe Coded SaaS
From idea to paying customers using AI coding. Real workflows, tool comparisons, failures, and wins. Practical guide for building SaaS with Claude Code.
Learn MoreIn order to demonstrate how to implement contract ownership, we're going to implement an ownable smart contract based on the OpenZeppelin implementation of Ownable. We will simplify the code a little bit for the purpose of learning how ownable contracts work. In addition to owership functions, in the contract we will demonstrate some examples of contract inheritance and using function modifiers.
Before you begin
The source code for this article can be found here.
If you are totally new to smart contract development, it's recommended to take a look at our earlier articles before this one!
Setting up your crypto dev environment
Deploying your first Smart Contract with Truffle and Ganache
What are the functions of an ownable smart contract?
So let's get started! What are the primary functions of an ownable smart contract? First, in order for something to be ownable, there needs to be a way to declare that a person, or an Ethereum account in this case, is the owner of the contract. Second, there needs to be a way to restrict access to the contract to just the owner's Ethereum account. And in the event that the owner decides to hand over control of the contract to another person, there needs to be a way to functionally transfer that ownership to the other party.
The Logic to declare that someone is the owner
Let's take a look how the contract might declare the owner. When first deployed, the application should automatically assign ownership of the contract to the sender, who happens to be the person who is deploying the contract. For this reason we will set the value of the owner in the smart contract's constructor.
In the code that follows, the smart contract privately tracks a variable to store the owner's address. And then in the constructor, the owner value is set to the account that was used to deploy the contract. This essentially fulfills the requirement to be able to declare the owner of the contract.
address private _owner;

constructor() {
    _owner = msg.sender;
}
The logic to provide access control to the contract owner
Once the contract has an owner, there needs to be a way to prevent non-owners from accessing specific functions on the smart contract. In this case we are going to use a function modifier, which allows us to apply specific logic to apply to any function that has this modifier. This will simplify our code logic in asserting the only the owner can access the function. Our modifier will be called "onlyOwner", implying that only the owner can execute this function.
modifier onlyOwner() {
    require(owner() == msg.sender, "Ownership Assertion: Caller of the function is not the owner.");
    _;
}
We apply the modifier to the function call like this in our DocumentRegistry contract. In order to prevent just anyone from adding a signed document to the registry, only the owner can execute this function. This is done by adding the modifier onlyOwner to the function call as we do in the following example. This allows us to provide access control to only the owner of the contract for certain protected functions.
function add(string memory hash) public onlyOwner returns(uint256 dateAdded){
    uint256 timeAdded = block.timestamp;
    documents[hash] = timeAdded;
    return timeAdded;
}
The logic to transfer ownership of a contract to a different address.
Finally, in the event that the developer of the smart contract decides to move ownership of the contract to another wallet, or if they want to sell their application or move it to another's control, there will need to be a way to transfer ownership of the contract to another.
To do this, a function needs to be created called transferOwnership, which will take the new address and assign ownership to that address. This function should only be accessible by the current owner of the contract and therefore will leverage the onlyOwner modifier.
function transferOwnership(address newOwner) public virtual onlyOwner {
    _owner = newOwner;
}
The source code for ownable.sol
Now that the primary functions have been explained here is the complete ownable.sol contract.
// SPDX-License-Identifier: MIT

// basic ownership functions
// 1) Ability to assert someone is an owner of a smart contract
// 2) Ability to restrict function calling to the contract owner
// 3) Ability to transfer ownership to another wallet

pragma solidity ^0.8.0;

// Ownable.sol = provides contract ownership functions
abstract contract Ownable {

    address private _owner;

    constructor() {
        _owner = msg.sender;
    }

    function owner() public view virtual returns (address) {
        return _owner;
    }

    modifier onlyOwner() {
    require(owner() == msg.sender, "Ownership Assertion: Caller of the function is not the owner.");
      _;
    }

    function transferOwnership(address newOwner) public virtual onlyOwner {
        _owner = newOwner;
    }
}
The source code for DocumentRegistry.sol
Now that we have a way to define a smart contract that is ownable, we can create the DocumentRegistry contract which will take a SHA256 hash as an input and store it in the smart contract, as well as provide a way to verify the signature of the document.
// SPDX-License-Identifier: MIT
pragma solidity ^0.8.12;

import "./Ownable.sol";

contract DocumentRegistry is Ownable{

    mapping (string => uint256) documents;

    function add(string memory hash) public onlyOwner returns(uint256 dateAdded){
        uint256 timeAdded = block.timestamp;
        documents[hash] = timeAdded;
        return timeAdded;
    }

    function verify(string memory hash) public view returns(uint dateAdded){
        return  documents[hash];
    }
}
These two files are the entire smart contract for this article! Once you compile the contract and migrate it to your local blockchain you will then be able to test out the function calls for the document registry, and the ownable related functions.
Calling the ownable smart contract's functions
As long as our development environment is set up, we can now migrate the contract to our localized Ganache blockchain using truffle using the truffle migrate CLI command.
truffle migrate
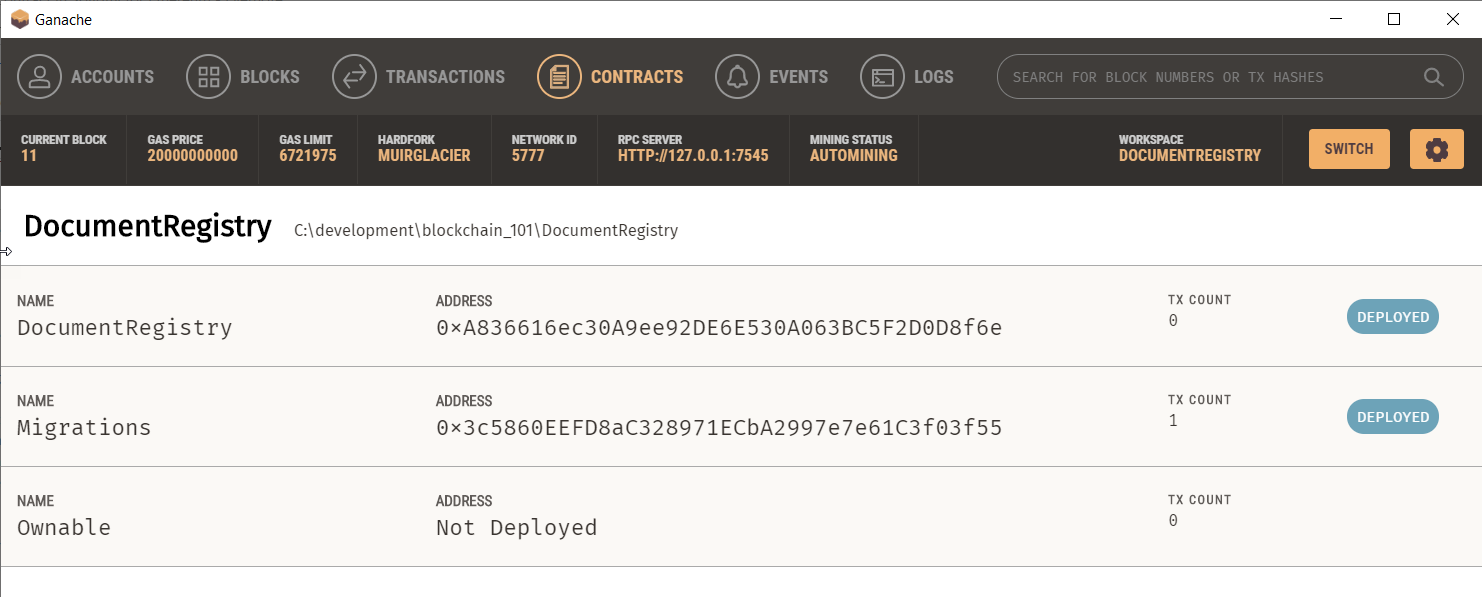
Once the contract has been migrated we should be able to see that it is listed in the "contracts" tab of ganache.
Running the document registry functions from Truffle console
Now we will run the truffle console and run the following commands. First an instance of the contract will be created. Then we will add a SHA256 hash of a document to the contract. After that, the same document will be validated. There are also some commands below that show how to get the human readable date of when the document was added to the registry. And next we will work take a look at the ownership functions.
Create an instance of the contract
let instance = await DocumentRegistry.deployed()
Add a document hash to the Document Registry
In this step we will add a document hash, unsing SHA256, to the document registry. I did not make a UI for the hash, and instead just made a quick one using sha256 online
Every unique document can be digitized and "hashed" using the SHA256 algorithm, which is a one-way puzzle, much like that used in proof of work blockchains. This hash can be like a unique signature for the document, and it means that you could take any document, and hash it again using the same method. If the hash string is the same as the one stored in the document registry then the document is can be determined to be an exact copy!
In this step we call the smart contract to add the document hash.
var added = await instance.add("6a2128aaf3197e455f54921fe54f75eef76e003488fbbbe644996bc5ee9059a6")
If you run a console.log on "added" you will likely see a transaction object with a successful message in return.
Verify document hash is in registry
Next we will make a function call to the contract to verify the SHA256 hash of the document is found in the document registry.
var verification = await instance.verify("6a2128aaf3197e455f54921fe54f75eef76e003488fbbbe644996bc5ee9059a6");
Use verification to display registery date
We will next use the verification data and convert it from a Big Number to just a simple number.
var dateNum = verification.toNumber();
This must be multiplied by 1000 because JavaScript date is the number of milliseconds since 1970 and block.timestamp is the number of seconds since 1970. Hence we multiple by a factor of 1000.
var dateNumEpoch = dateNum * 1000;
var dt= new Date(dateNumEpoch);

// march 22, 2022
console.log(dt);
// 2022
console.log(dt.getFullYear());
Testing out the ownable calls
So far we have just testing out the basic functions of the Document Registry, but we have not tested out the ownable functions. So let's try to see who the owner is, and add a document as an Ethereum account that is not the owner.
// find the owner
var own = await instance.owner()
console.log(own)

// the output
0x285146F1D972b748C9BD2079E1F9E1Ce332e4569

// adding a document as a non-owner account
var addAsOther = await   instance.add("6a2128aaf3197e455f54921fe54f75eef76e003488fbbbe644996bc5ee9059a6",  {from: "0xf5746391f079827095E64C3146c8c10D892efc59"})
In this example, we tried to send the document over to the contract as another account than the one that owns it and it threw an error. In the error message you can find the reason that it failed to execute.
reason: 'Ownership Assertion: Caller of the function is not the owner.'
So, now let's try this again, except first we will transfer ownership of the contract to the other account from the previous example.
// transfer ownership
var xfer = await     instance.transferOwnership("0xf5746391f079827095E64C3146c8c10D892efc59");

// find the new owner
var own = await instance.owner()
console.log(own)

// the new owner should be displayed
0xf5746391f079827095E64C3146c8c10D892efc59

// adding a document as a non-owner account
var addAsOther = await instance.add("6a2128aaf3197e455f54921fe54f75eef76e003488fbbbe644996bc5ee9059a6",{from: "0xf5746391f079827095E64C3146c8c10D892efc59"})
And this time, the function should have executed without an error and the new owner should be created.
What we learned
Today we learned about the basic functions of an ownable smart contract. We learned how to assert that a person's Ethereum address is the owner of a contract, and to restrict access to functions of the smart contract to only the owner. In addition we learned how to create functions that will allow for the ownership of a smart contract to be transferred to another.
Now that we have a few smart contracts completed, it's time to take on a more complex implementation. In the next article we will learn how to create a token using the ERC-20 token standard.
Thanks for reading!