Deploying Smart Contracts with Truffle and Ganache
In this article, we're going to deploy our first Solidity smart contract using the onto a localized blockchain host environment called Ganache. The tool that we will be using to do this is called Truffle. Truffle and Ganache make up a powerful toolset that you will be able to use to automate and test your Solidity smart contracts.
In this article, we're going to deploy our first Solidity smart contract onto a localized blockchain host environment called Ganache. The tool that we will be using to do this is called Truffle. Truffle and Ganache make up a powerful toolset that you will be able to use to automate and test your Solidity smart contracts.
The source code repo for this course can be found here. Code Repo

The Sony Hack
A Seth Rogen comedy. A nation-state cyberattack. 47,000 lives upended. When North Korea declared war on a Hollywood studio, the cybersecurity world changed forever. The Sony Hack is the definitive account of the breach that proved no company — no matter how powerful — is safe from a determined nation-state actor. New from the Digital Outlaws series.
Learn MoreIn the last article in the series, we developed and compiled our first smart contract using the SOLC-JS Solidity Compiler. If you missed that one, you can find the last article here. Developing your first Smart Contract.
Setting up your dev environment
If you have not yet installed the tools that you need for this course, please take a gander at my page, Setting up your Crypto Development Environment. In addition, this article assumes some level of technical ability. I will do my best to make it as accessible as I can.
What is Truffle?
Truffle is a development environment for Ethereum and EVM (Ethereum Virtual Machine) compatible blockchains. It serves as a devops platform to enable deployment and testing of your smart contracts. For more info about Truffle, see the docs! Truffle Documentation.
What is Ganache?
A part of the "Truffle Suite" of tools, Ganache serves as a local host blockchain that you can deploy your contracts to safely, allowing you to create and test your applications on your own computer. When you fire up Ganache on your computer you will get a list of 10 pre-created Ethereum wallet accounts each with 100 ETH, can view your transactions and smart contracts that are on-chain. For more information about Ganache
Initializing the Project
So let's get started! Proceed to your nearest CLI to create and navigate to the directory on your computer where you are going to build the contract. Then run the "truffle init" command.
mkdir storevalue
cd storevalue
truffle init
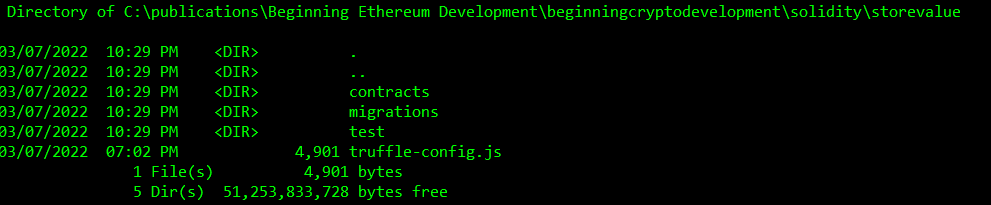
Running the truffle init command will create a scaffolding of three directories.
- contracts - where your smart contract code will be stored. This folder will be populated with a file called Migrations.sol. The Migrations contract simply allows truffle to set the last migration date to help track migrations onto the Ganache blockchain.
- migrations - this is where javascript files for helping deploy your contracts will be stored. There will be a file in there for the initial deployment.
- test - this is the location for your test scripts
In addition to the three directories will be a file called truffle-config.js, which will contain all of the configurations used in the deployment. You will not need to edit that file at this time.
The Code
This will be an extremely simple program. This will just allow us to learn how to deploy a simple contract for now and then we will move on to more complex use cases such as NFT and Token contracts.
We will create a file in the contracts directory, and name it StoreData.sol.
Below is the complete source code.
// SPDX-License-Identifier: GPL-3.0
pragma solidity ^0.8.12;

contract StoreValue{
    private uint value;

    function set(uint v) public{
        value = v;
    }

    function get() public view returns(uint){
        return value;
    }
}
In case you skipped the previous articles, we will explain each line.
First we will insert the SPDX Identifier. The smart contract is Open Source code, and this will denote what license structure you would like to use for the contract. I chose GPL-3.0 (GNU Public License), but most people use MIT.
The pragma line directs the compiler to target a specific version of Solidity. As of this writing I chose 8.12
// SPDX-License-Identifier: GPL-3.0
pragma solidity ^0.8.12;
The smart contract block is named StoreValue. This is the main body of code.
contract StoreValue(){
}
We then declare a variable to store a simple uint, or unsigned integer, value. Unsigned integers can only hold positive numbers. We make the visibility of this variable private, prevent direct manipulation of the contract value other than from the next function that we will create.
private uint value;
Our next block of code is the set function, where we will set the value in the contract with whatever integer is passed into it.
 function set(uint v) public{
    value = v;
}
And then we create a get function that allows us to retrieve the value. Note that this function has a view modifier on it that tells the compiler that this is just a read-only function. This is for optimization purposes.
function get() public view returns(uint){ return value; }
The code is now written and we can proceed to the next step and try to compile the code and make sure that its bug free before deploying.
Compiling the Solidity Code
In the last article we compiled the smart contract directly using SOLC-JS. This time we will use Truffle to compile the code for us. Don't worry, it's actually using SOLC under the hood to do this for us.
On the command line and in your working folder, type the following command.
truffle compile
As long as no errors occur, the output should look roughly like this.
If you do get errors, common mistakes are missing semicolons or braces. You would get an error message and can troubleshoot from there as this is a very simple program. You will see that Truffle actually compiles all of the contracts that are in the "Contracts" folder and then creates the artifacts to put them into a new folder ./build/contracts.

Once the contract has compiled successfully a new file will be found in the truffle folder scaffolding that was created. The file will be called StoreValue.json.
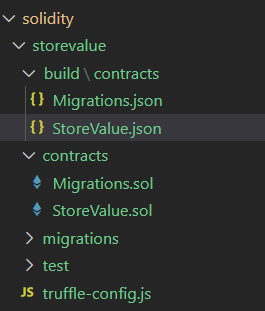
This json file contains metadata about the contract as well as the compiled byte code. The Migrations.json built contract file is the same thing except to specify the contract that will be deployed to help manage deploying the contract to the network.

So we have now successfully compiled the contract and we're ready to send to to our Ganache blockchain.
Deploying to the Blockchain
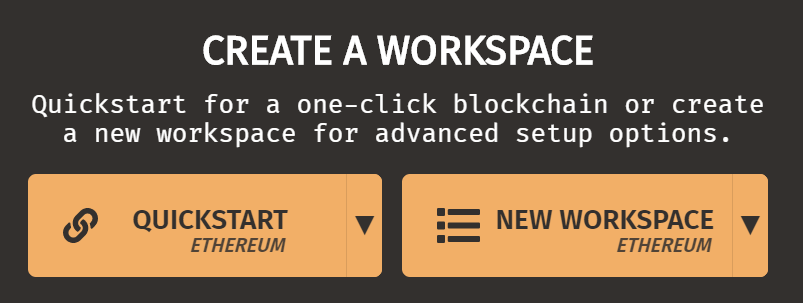
Let's fire up ganache. This version is called Ganache UI, but there is a CLI version of Ganache as well. For this tutorial we will use the UI version.
Select "New Workspace" to create a workspace that can be configured.
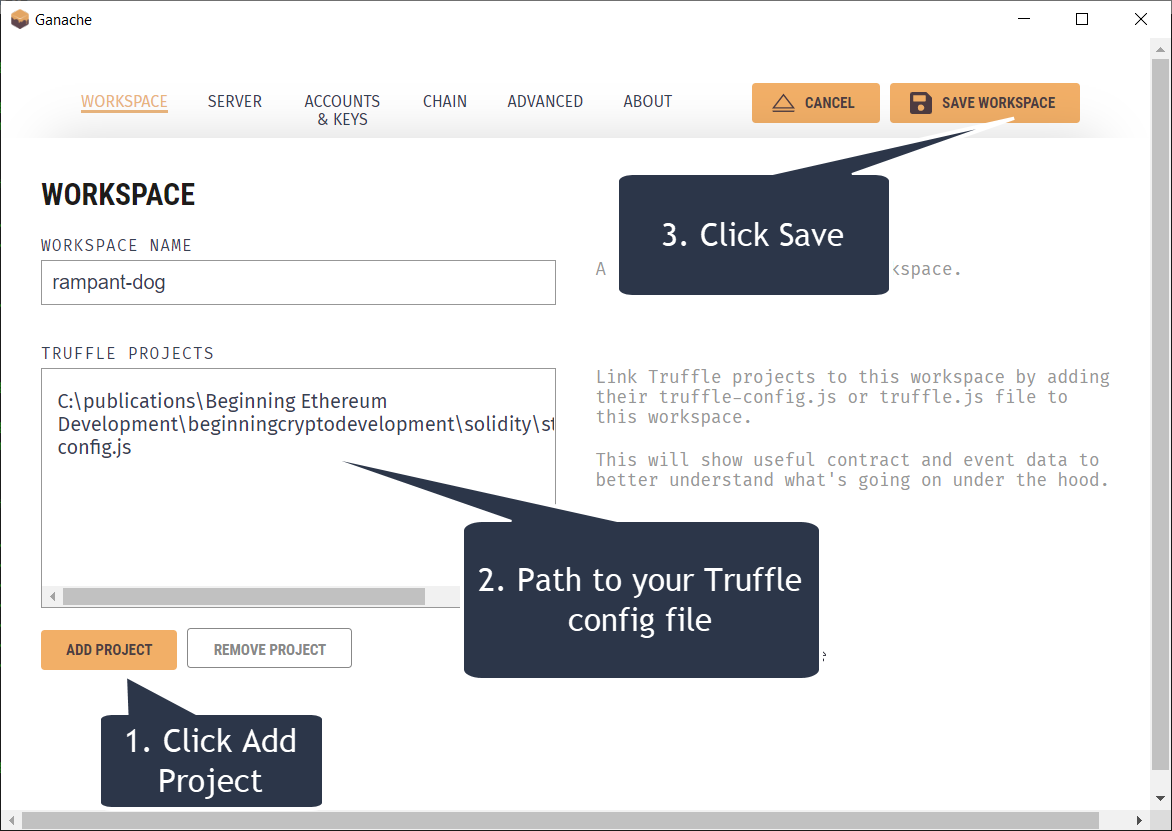
In the next screen, you will be taken to a workspace config page where you can rename the workspace and change settings. Feel free to explore the various tabs, but today we're only going to use the workspace tab
Three steps to configure your Ganache Workspace
- Click Add Project
- Set the Truffle Projects value to the path to your truffle-config.js file. This will link up Truffle to the workspace.
- Then click Save!
Now, you will arrive on the "Accounts" view where you should have 10 accounts each with 100 ETH. And we're ready to move on to deployment!
Migrating your Contract to the Blockchain
Truffle calls a deployment a migration. This is why you see a migrations folder, contracts and scripts.
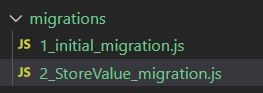
And this is one last configuration step that you will need,. In your code, in the migrations folder, we need to create a script to migrate the contract that we created.
This image shows the location of where the migration script should live. The file is JavaScript and should be named 2StoreValuemigration.js
Here is the code for the migration, which is simply a mofication of the 1initialmigration.js file.
// 2_StoreValue_migration.js

const Migrations = artifacts.require("StoreValue");

module.exports = function (deployer) {
  deployer.deploy(Migrations);
};
So let's get on to the next step! We want to see the contract running on the blockchain. Make sure that your Ganache client is running! Otherwise backtrack some and get it running.
Once Ganache is running the next step is simply to deploy the contract using the command , which will result in some output that should look like it does in the following image.
truffle migrate
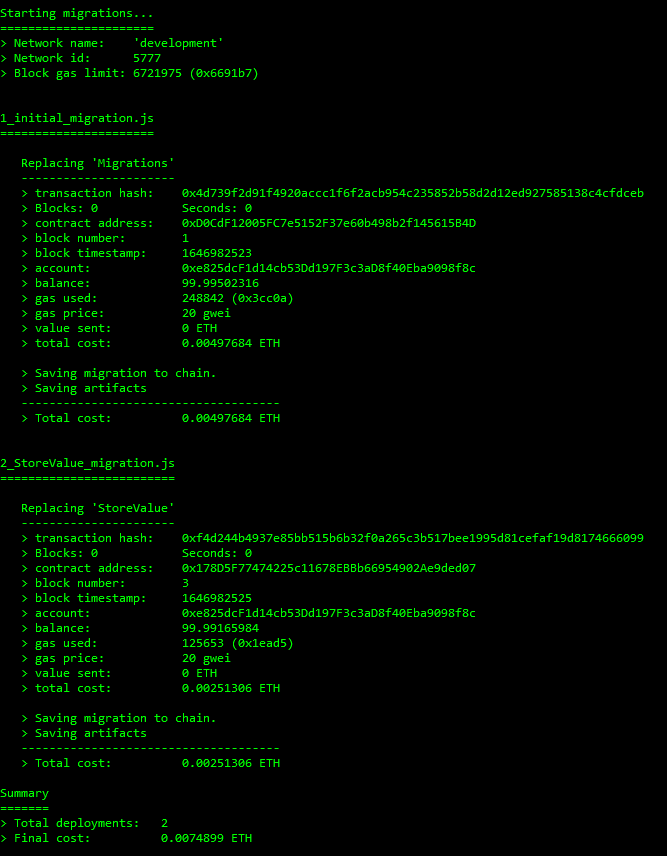
This will compile the contracts once again and then start the migration. Migration is the process of deploying the compiled contract to the Ethereum (or other EVM compatible) ecosystem. Migrating the contract requires that a transaction be made, and therefore the output will also include a transaction hash and other details about the transaction including the cost of the gas fees in ETH. This is good because you can configure the gas price and limit in the truffleconfig.js file which will help you in estimating the actual cost that the contract will cost to deploy to the Ethereum Mainnet. Of course, there is no cost when deploying to Ganache, making it great for development.
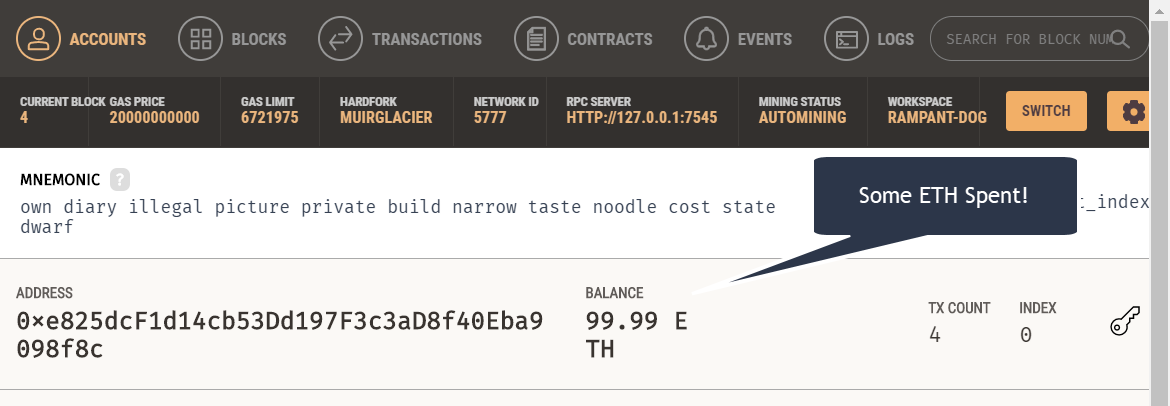
Checking for the contract in Ganache
On the Accounts Page of Ganache should now see two signs that the contract is deployed. First you should be able to see that there has been a fee applied to the account because the balance has decreased slightly. Also you can see that two transactions have been applied to the account.
If you proceed to take a look at the contracts tab in ganache, you will be able to see the StoreValue contract can be found there. You should see the word "Deployed" to the right of StoreValue. If Store Value is not found, or if the status says "Not Deployed", you will need to retrace your steps and try to redeploy. Hint: You might have missed the Migration script in the migrations folder.
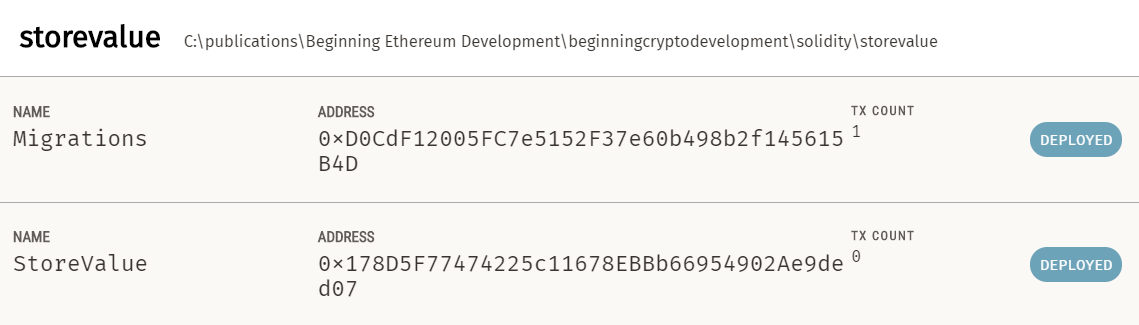
You will also be able to see information about blocks and transactions that were made on the various tabs in Ganache. And this all means that the contract was deployed!
Calling the Contract's Functions
Now that we know that the contract has been deployed to the blockchain, let's try to call it to see the value that is stored. We will use the truffle console for this step.
truffle console
// you will see a CLI
//create a var to store an instance of the contract
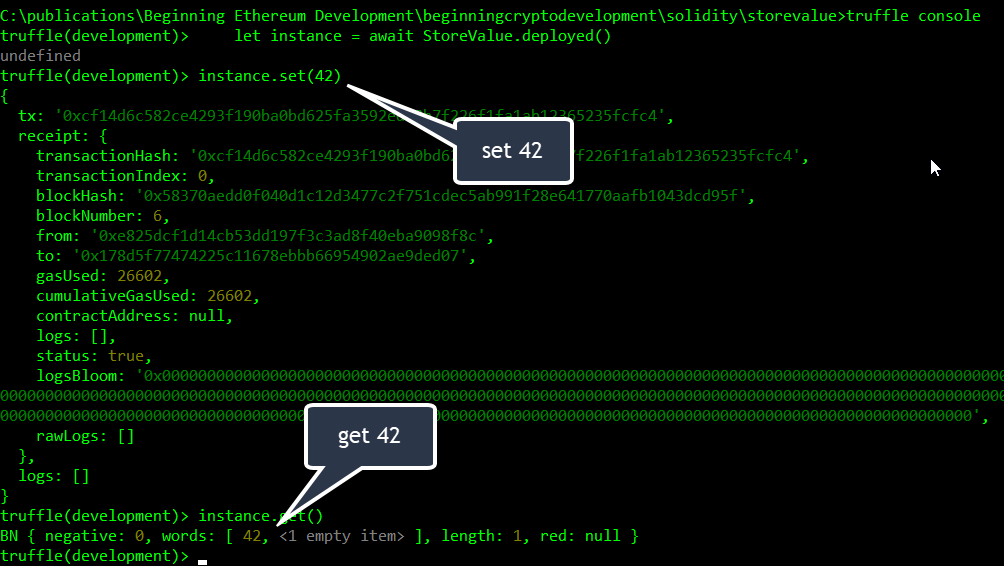
truffle(development)> let instance = await StoreValue.deployed()
//set stored value to 42
truffle(development)> instance.set(42)
//get stored value
truffle(development)> instance.get()
The following image is an example of the above interactions in the truffle console.
Summary
That's it! We wrote a simple smart contract, compiled it, migrated it to the blockchain and tested out the function calls. Deploying the same contract to a live blockchain network is only a few more simple steps. You should now be able to expand your knowledge of smart contracts and start to create new and amazing web3, defi, gamefi or other applications!
In the next articles we will create an ERC-20 Token, which is the most common token smart contract standard on Ethereum. After that we will be creating an ERC-721 NFT contract as well.
Thank you for reading my tutorial!
I hope you enjoyed it. If you did and you want to drop me some ETH, here's my address! 0x56Df821E3D7Cb72464A85C511c9909b1F05e79C1.