Building an API Gateway with NGINX
In this article we will learn how to install NGINX and use it to create an API Gateway.
Introduction
Check out my newer tutorial on this subject that includes more features.
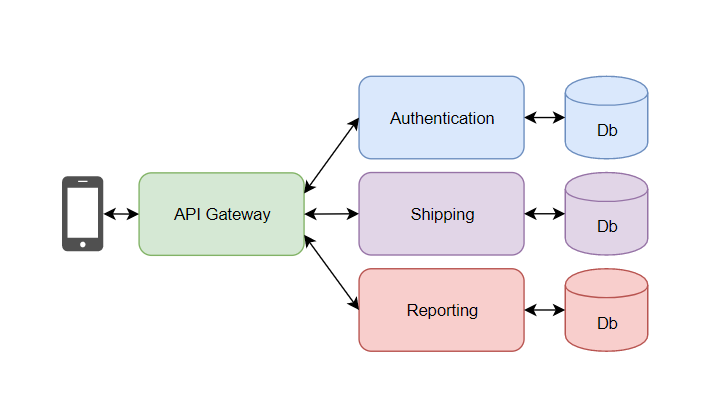
As microservice architectures have become more prevalent, the need to provide ways for client applications to communicate with the API's has become more important than ever. Rather than all API functions being available from a single monolithic application, they are distributed, meaning that functions are broken up into multiple single function API's.

The 90-Day AI Transformation: A Week-by-Week Playbook for CIOs Who Need Results Now
Stop planning your 18-month AI roadmap. This week-by-week playbook takes tech leaders from zero AI deployments to measurable production results in 90 days.
Learn MoreOne option is to manage communication with the microservices using the client application itself. But as more and more functions are added, this becomes difficult to manage.
This is where the API Gateway pattern comes in. An API gateway is a web-server that provides an single entry point into the microservices architecture.
In this article I will show you the basics of how to create an API gateway using NGINX.
Installing NGINX
NGINX is a web server, load balancer, forward and reverse proxy server as well as a cache manager. It's really one of the most amazing web server technologies out there. I will quickly show you how to install it on Ubuntu Linux. You can also pull it from Docker as well and run it in a container.
I will use sudo throughout the article, but that may not be required for you depending on your Linux configuration.
First, you will want to update packages.
sudo apt-get update
Fetched 29.5 MB in 1min 22s (362 kB/s)
Reading package lists... Done
And then it's as simple as installing NGINX
sudo apt-get install nginx
The installer will download and install the files and as long as everything went according to plan, nginx should now be installed.
Depending on your server or container, or wherever you installed NGINX, you may have to configure firewalls or expose ports. I won''t go too much into detail on this here, but check with your cloud provider for firewall details.
Now you should be able to navigate to the web server by accessing the IP address from a web browser like this…
http://<ip address>:<port>
or
https://<ip address>:<port>
Mine looked like this…
https://162.243.144.211
or if you are using DNS you could just navigate to the URL
https://my_nginx_domain_name.com
If you made it this far, congrats! Now your NGINX web server is up and running.
Configuring the API Gateway
Next we will configure the gateway to connect to our three microservices. In this case all three are running on the same server, but they could literally be anywhere on the Internet!
Here is the list of microservices that I will use with this API gateway.
Authentication: 162.243.144.211:8080
Shipping: 162.243.144.211:8081
Reports: 162.243.144.211:8082
Next, you will want to navigate to the nginx default configuration file. Then edit it with a text exitor. I use nano, but you could also use vi or another type of text editor depending on your environment.
cd /etc/nginx/sites-available

sudo nano default
This is the file that you will use to configure the API Gateway. Remove all of the text and replace it with the below configuration text.
upstream authentication{
  server 162.243.144.211:8080;
}
upstream shipping {
  server 162.243.144.211:8081;
}
upstream reporting {
  server 162.243.144.211:8082;
}

server {
  listen 443;
  location /auth/ {
        proxy_pass https://authentication/;
  }
  location /shipping/ {
        proxy_pass https://shipping/;
  }
  location /reporting/ {
        proxy_pass https://reporting/;
  }
}
In the above example, we set up three "upstream" directives, one each for authentication, shipping and reporting services. Next, the server is configured by setting up the forward-proxy route for each service.
Now that this is complete, you can get the API gateway running by reloading the nginx webserver. Reloading the webserver in this way allows for you to change the configuration of NGINX without stopping the service. This means that you can create DevOps automations that will automatically maintain this config file for you and dynamically reload the API gateway as you add or remove services.
service nginx reload
Once you have completed this you can test the API gateway by navigating to the URL for your API gateway and using the routes. Depending on how you have set up your API's you may need to use an API tester like Postman
#the Authentication route
https://162.243.144.211/auth

#the  Shipping route
https://162.243.144.211/shipping

#the  Reporting route
https://162.243.144.211/reporting
Congratulations! You should now have a running API gateway!
Adding Load Balancing
Imagine that your application has increased its user base, and now the authentication API needs to be scaled out to handle the additional load. Using NGINX you can also load balance your API Gateway. Doing this is quite simple.
Once you have created an additional instance of the microservice on your infrastructure, you simply update the upstream directive for the authentication service.
upstream authentication{
        server 162.243.144.211:8080;
        server 162.243.144.211:8082;
}
As you can see in the above example, I have added a second instance of the authentication microservice to the configuration.
Next we simply reload NGINX and your authentication service should be load balanced!
service nginx reload
Conclusion
Today we used NGINX to create a simple example of an API Gateway. This can allow for you to scale your microservices architecture easily and even dynamically load new configurations as your application's usage grows. I hope that you found this article useful!
If you would like to check out the companion video to this article, it can be found on my YouTube channel at the following location.
How to create an API Gateway with NGINX - Video
If you would like to learn more about NGINX here is their website. https://www.nginx.com/